Showing posts with label CSV Files. Show all posts

Thursday, 11 February 2021

Extracting Data from CSV file to SQL Server using Azure Blob Storage and Azure Data Factory

Objective

One of the general ETL practice that is needed in the cloud is to inject data from a CSV file to a SQL the file will be within Azure Blob Storage and the destination SQL is a Azure SQL Server. Once moving to the cloud the the ETL concept changes because of the large amount of data or large amount of ETL file loads and for that a automated/configured mechanism is required to load the hundreds and hundreds of files maybe an IoT data load might be a good example, an IoT service may have have more than one hundred devices, each device generates hundreds of files every day.
The solution is to create a config table in SQL that contained all the information about an ETL like 
1 - Destination SQL table
2 - Mapping fields
3 - ...
4 - Source File Path
5 - Source File name and extension 
6 - Source File Delimiter
7 - etc...

Requirements

    The Azure Data Factory (ADF) will read the configuration table that contains the source and the destination information and finally process the ETL load from Azure Blob Storage (Container) to Azure SQL database, the most important part is that the config tale contains te mapping field in a JSON format in the config table


        A mapping JSON example looks like 
'
{"type": "TabularTranslator","mappings": [
{"source":{"name":"Prénom" ,"type":"String" ,"physicalType":"String"},"sink": { "name": "FirstName","type": "String","physicalType": "nvarchar" }},
{"source":{"name":"famille Nom" ,"type":"String" ,"physicalType":"String"},"sink": { "name": "LastName","type": "String","physicalType": "nvarchar" }},
{"source":{"name":"date de naissance" ,"type":"String" ,"physicalType":"String"},"sink": { "name": "DOB","type": "DateTime","physicalType": "date" }}
]}
'

Some of the config table are as mentioned
    Source Fields 
  1. [srcFolder] nvarchar(2000)
  2. [srcFileName] nvarchar(50)
  3. [srcFileExtension] nvarchar(50)
  4. [srcColumnDelimiter] nvarchar(10)
  5. etc...
    Destination Fields
  1. [desTableSchema] nvarchar(20)
  2. [desTableName] nvarchar(200)
  3. [desMappingFields] nvarchar(2000)
  4. ....
  5. [desPreExecute_usp] nvarchar(50)
  6. [desPostExecute_usp_Success] nvarchar(50)
  7. ....

Please note…
  • The DFT is called by a Master pipeline and has no custom internal logging system
  • The three custom SQL stored procedures are not included in this solution
  • Three custom SQL stored procedures can be used/set within the configuration table for each ETL , one for PreETL, second PostETLSuccess and Finally PostETLFailure
Do you want the code? Click here (From Google).

Extracting Data from SQL to CSV files using SSIS and PowerShell 7.x

 Objective

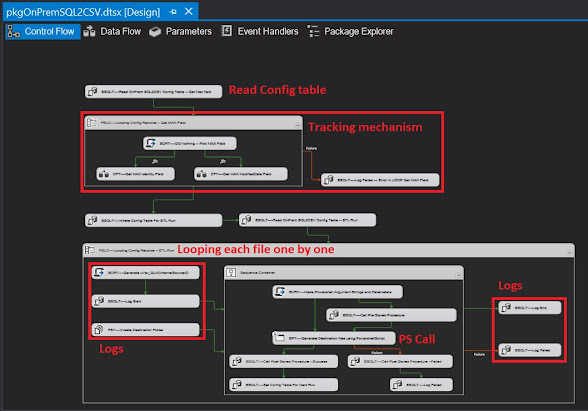
I decided to combine SSIS and PowerShell 7.0 to create one new ETL SSIS package that transfers CSV files to SQL server using a configuration table, the objective is to create a config table in SQL that contained all the information about an ETL like 
1 - Source SQL table
2 - Selected fields
3 - Filters like the t-sql WHERE clause 
4 - Tracking mechanism
5 - Destination File Path 
6 - Destination File name and extension
7 - etc...

.

Requirements

    The powershell script will read CSV files and insert the data into a SQL Server destiantion table, the parameters are as mentioned.
  1. [String]$srcSQLServerConnectionString = "Server = ABC ; Database = XYZ; Integrated Security = True;"
  2. [String]$srcSELECTQuery = "SELECT Fields  FROM tblXYZ"
  3. [String]$desFilePath = "<DRIVER>:\...\ETLFolder\FileToBeSFTPed"
  4. [String]$desFileName = "YYYY-MM-DD HHMMSS FileName"
  5. [String]$desFileExtension = "csv"                                 OR "txt"
  6. [String]$desColumnDelimiter = "TAB"                       # "TAB"   "`t"    |    ;    `
    At this point the SSIS package will read the config table, start a "Tracking mechanism" (getting the MAX identity field or MAX modified date) then create a final T-SQL string for the PowerShell.

            Some of the config table are as mentioned
    Source Fields 
  1. [srcTableSchema] nvarchar(20)
  2. [srcTableName] nvarchar(200)
  3. [srcFieldList] nvarchar(2000)
  4. [srcWHEREClause]                 nvarchar(1000)
  5. etc...
    Destination Fields
  1. [desFolder] nvarchar(2000)
  2. [desFileName] nvarchar(50)
  3. [desFileExtension] nvarchar(50)
  4. ....
  5. [srcPreExecute_usp] nvarchar(50)
  6. [srcPostExecute_usp_Success] nvarchar(50)
  7. ....

Please note…
  • PowerShell script may need to be registered
  • The SSIS has an internal logging system
  • Three custom SQL stored procedures can be used/set within the configuration table for each ETL , one for PreETL, second PostETLSuccess and Finally PostETLFailure
Do you want the code? Click here (From Google).

Sunday, 8 April 2018

Looping Through Excel (97-2003) Files And Sheets using SSIS 2016

Objective

After writing an article about “LoopingThrough Flat Files using SSIS 2016” I decided to blog about the same subject but this time related to excel, again I have to say yes it is a very old subject but I see that most of the companies are using very very old blogs (one like mine from 2010) and not seeing that the old approaches require polishing like….

  1. Converting the SSIS to SSIS2016+
  2. Using SSIS Project Model
  3. SSIS Project Parameters
  4. Package Parameters
  5. New techniques/tricks/approach/design
  6. Package Part
  7. SSISDB
  8. Etc…

      I decided to create a small ETL that extracts all the sheets from an Excel (97-2003) files to SQL table and apply as much as I can from the above list, so let’s start.

Requirements

       1.A main folder, in my case it is “C:\P_C\2018\SQL2016\SSIS\ Exl2SQL-Exl97-2003” and it will be set in the Package Parameter called “uPara_MainFolderPath”
       2.Create 2 Sub folders in the above folder “SampleFile”, “ToBeProcessed”
       3.A Sample CSV file called “SampleFile.csv” with data in the “Samplefolder”

Over look at the SSIS Project and package


Variables at 3 Levels, "Project", "Package Parameter" and "Package Variables"


        After creating a SSIS package, first thing is to create variables at 3 levels/locations within the SSIS project and package.


        1 - Variables at the “Project Parameter” level
               Create 2 Variables, one for your destination SQL server and one for your destination DB name.        


        2 - Variables at the “Package Parameters” level


        3 - Variables at the “Package Variables” level
                Except the “uVar_ExcelConnectionString” variable all other expression variables will be erased during the run time (My new design and technique). The only “Package Variable” you might want to change during your design time is the “uVar_ExcelConnectionString” variable.


             You can see that I have added 3 new package variables related to the Excel file and its related objects, the only variable that you might need to change is the excel connection string variable (For example I added IMEX=1), and the sheet name during the development time.

1- "uVar_ExcelConnectionString": This is the excel connection string
"Provider=Microsoft.Jet.OLEDB.4.0;Data Source=" + @[User::uVar_SourceFile]  + ";Extended Properties=\"EXCEL 8.0;HDR=YES;IMEX=1\";"

2- "uVar_ExcelSheetName": Change this sheet name to your default sheet name in the SampleFolder, this name will only help you during the development and during runtime it will be overwritten by new sheet name each time.

3- "uVar_ExcelSheetObjectList": This is a SSIS package object Variable that will contain the list of Excel Sheet Names.

Source and Destination Connection Objects

        We need one source “Excel File” connection object to do the reading and one SQL destination “OLEDB” connection object to do the writing.


 1.“Excel File” (Source)

 2.“OLEDB” (Destination)


Package Flow

          The package has 2 main section, one is to create backup folder, clear Expressions, and some other variable settings, the second one is to loop through each excel (97-2003) Files one by one and loop through each Sheet one by one, do the ETL and finally move the file to the backup folder, I will not explain the above two section except how I set the second “For Each Loop” in SSIS. I have added a T-SQL script to create the destination table (look for DestinationClientTable.sql file)

         The first Loop must be set in 3 sections that you can go to my previous blog and check how, click on “Looping Through Flat Files using SSIS 2016”.

         After the first loop you will see a .Net code object script “SCRIPT-----Get The List of Excel Sheets” that will extract the list of excel sheets and place them into the variable “uVar_ExcelSheetObjectList” which is a SSIS object variable.


The .Net code that loops through the sheets in each excel files goes like this.

    Public Sub Main()
        Try
            '--------------------------------------------------------
            ' User::uVar_ExcelConnectionString
            ' User::uVar_ExcelSheetObjectList
            '--------------------------------------------------------

            '--- Added by SQL Data Side Inc.  Nik-Shahriar Nikkhah
            ' Don't forget to add >>>>>    Imports System.Data.OleDb
            Dim excelConnection As OleDbConnection

            Dim connectionString As String
            Dim tablesInFile As DataTable
            Dim tableCount As Integer = 0
            Dim tableInFile As DataRow
            Dim currentTable As String
            Dim tableIndex As Integer = 0
            Dim excelTables As String()
            Dim LoopForNumnberOfRealTabs As Integer = 0

            connectionString = Dts.Variables("User::uVar_ExcelConnectionString").Value.ToString

            excelConnection = New OleDbConnection(connectionString)
            excelConnection.Open()

            tablesInFile = excelConnection.GetSchema("Tables")
            tableCount = tablesInFile.Rows.Count

            For Each tableInFile In tablesInFile.Rows
                currentTable = tableInFile.Item("TABLE_NAME").ToString
                'str = tableInFile.Item("TABLE_Type").ToString
                'str = tableInFile.Item("TABLE_SCHEMA").ToString
                'str = tableInFile.Item("TABLE_CATALOG").ToString
                currentTable = currentTable.Replace("'", "")

                If Right(currentTable, 1) = "$" Then
                    LoopForNumnberOfRealTabs += 1
                    ReDim Preserve excelTables(LoopForNumnberOfRealTabs - 1)
                    excelTables(LoopForNumnberOfRealTabs - 1) = currentTable
                End If
            Next

            excelConnection.Close()
            excelConnection = Nothing

            Dts.Variables("User::uVar_ExcelSheetObjectList").Value = excelTables
            Dts.TaskResult = ScriptResults.Success

        Catch ex As Exception

            Dim strEX As String
            strEX = ex.Message.ToString
            Dts.TaskResult = ScriptResults.Failure

        End Try
    End Sub
------------------------------

Then comes the second loop that uses the “uVar_ExcelSheetObjectList” package variable (populated in the “SCRIPT-----Get The List of Excel Sheets” step) which contains the list of the excel sheets and loops through them one by one, on each loop it places the excel sheet name into the “uVar_ExcelSheetName” variable that will be used in the source object in the DFT.

With 2 steps you can set up the second loop.

1.Collection


 2.Variable Mapping


Please check the DFT settings


How To Test?


  1. Set your SQL server name and SQL DB Name in the project parameters.
  2. Create the destination table (You can use DestinationClientTable.sql).
  3. Create a folder in my case it is “C:\P_C\2018\SQL2016\SSIS\Exl2SQL-Exl97-2003”.
  4. Copy the above Path in the “uPara_MainFolderPath” variable.
  5. Create 2 Sub folders 1 – SampleFile 2- ToBeProcessed.
  6. You must have your SampleFile97-2003.xls (97-2003 format) file copied in the SampleFile folder (I have provided two files, one of then has multiple sheets “SampleFile97-2003 - MultipleSheet.xls”).
  7. Copy all of your source files into the ToBeProcessed folder or you can use the SampleFile97-2003.xls to get the ball rolling (or use “SampleFile97-2003 - MultipleSheet.xls”).
  8. Run your SSIS package
  9. Using windows explorer go to the same path as defined in “uPara_MainFolderPath” variable, you will see a sub folder named “BackupFolder”.
  10. Now your files have moved from ToBeProcessed folder to the BackupFolder folder under todays “…\BackupFolder\yyyy-mm\yyyy-mm-dd-HHmmss\”
  11. Also please check your destination table, my sample uses the [dbo].[Client] table.

Please note if…


  • If your ToBeProcessed folder (Source Folder) is located on another folder/machine you can enter the valid path in the “uPara_ToBeProcessedFolder” variable.
  • If your Backup folder is located on another folder/machine you can enter the valid path in the “uPara_BackupMainFolderPath” variable.
Do you want the code? Click here (From Google).

References…

  1. http://plexussql.blogspot.ca/2010/04/looping-through-excel-files-and-sheets.html
  2. https://docs.microsoft.com/en-us/sql/integration-services/connection-manager/excel-connection-manager
  3. https://docs.microsoft.com/en-us/sql/integration-services/connection-manager/connect-to-an-excel-workbook
  4. https://docs.microsoft.com/en-us/sql/integration-services/extending-packages-scripting-task-examples/working-with-excel-files-with-the-script-task
  5. https://docs.microsoft.com/en-us/sql/integration-services/load-data-to-from-excel-with-ssis
  6. https://docs.microsoft.com/en-us/sql/integration-services/extending-packages-scripting-task-examples/working-with-excel-files-with-the-script-task
  7. http://www.madeiradata.com/load-data-excel-ssis-32-bit-vs-64-bit/

Sunday, 1 April 2018

Looping Through Flat Files using SSIS 2016

Objective

Yes I know I know, ……… the “Looping through CSV or text files” is very very very old subject and it may have 100s of solutions, but I had to blog about it again because looping through CSV or text files is very commonly required in the ETL world, but I see that most of the companies are using very very old blogs (one like mine from 2010) and not seeing that the old approaches require polishing like….
  1. Converting the SSIS to SSIS2016+
  2. Using SSIS Project Model
  3. SSIS Project Parameters
  4. Package Parameters
  5. New techniques/tricks/approach/design
  6. Package Part
  7. SSISDB
  8. Etc…
      I decided to create a small ETL that extracts Flat File to SQL table and apply as much as I can from the above list, so let’s start.

Requirements

  1. A main folder, in my case it is “C:\P_C\2018\SQL2016\SSIS\Txt2SQL” and it will be set in the Package Parameter called “uPara_MainFolderPath”
  2. Create 2 Sub folders in the above folder “SampleFile”, “ToBeProcessed”
  3. A Sample CSV file called “SampleFile.csv” with data in the “Samplefolder”

Over look at the SSIS Project and package


Variables at 3 Levels, "Project", "Package Parameter" and "Package Variables"

        After creating a SSIS package, first thing is to create variables at 3 levels/locations within the SSIS project and package.

        1 - Variables at the “Project Parameter” level
               Create 2 Variables, one for your destination SQL server and one for your destination DB name.        


        2 - Variables at the “Package Parameters” level

  • uPara_MainFolderPath: Mandatory folder that will contain all the required folder related to this ETL package, some folders can be changed/redirected with the next 2 variables.
  • uPara_BackupMainFolderPath: if you don’t want the backup folder to be in the same folder as “uPara_MainFolderPath” you can change it by adding a valid path.
  • uPara_ToBeProcessedFolder: if you don’t want the source folder to be in the same folder as “uPara_MainFolderPath” you can change it by adding a valid path.


        3 - Variables at the “Package Variables” level
                The expression variables will be erased during the run time (My new design and technique). The only “Package Variable” you might want to change during your design time is the “uVar_SourceFileType” that if the source flat file is a text file (*.txt), you can change the “*.csv” to “*.txt”


Source and Destination Connection Objects

        We need one source “Flat File” connection object to do the reading and one SQL destination “OLEDB” connection object to do the writing.

1.“Flat File” (Source)


2.“OLEDB” (Destination)


Package Flow

The package has 2 main section, one is to create backup folder, clear Expressions, and some other variable settings, the second one is to loop through the Flat Files do the ETL and finally move the file to the backup folder, I will not explain the above two section except how I set the “For Each Loop” in SSIS. I have added a T-SQL script to create the destination table (look for DestinationClientTable.sql file)
The Loop must be set in 3 sections


1.Collection

2.Expression

3.Variable Mapping


How To Test?


  1. Set your SQL server name and SQL DB Name in the project parameters.
  2. Create the destination table (You can use DestinationClientTable.sql).
  3. Create a folder in my case it is “C:\P_C\2018\SQL2016\SSIS\Txt2SQL”.
  4. Copy the above Path in the “uPara_MainFolderPath” variable.
  5. Create 2 Sub folders 1 – SampleFile 2- ToBeProcessed.
  6. You must have your Sample.csv file copied in the SampleFile folder (I have provided one).
  7. Copy all of your source files into the ToBeProcessed folder or you can use the Sample.csv to get the ball rolling.
  8. Run your SSIS package
  9. Using windows explorer go to the same path as defined in “uPara_MainFolderPath” variable, you will see a sub folder named “BackupFolder”.
  10. Now your files have moved from ToBeProcessed folder to the BackupFolder folder under todays “…\BackupFolder\yyyy-mm\yyyy-mm-dd-HHmmss\”
  11. Also please check your destination table, my sample uses the [dbo].[Client] table.

Please note if…

  • If your ToBeProcessed folder (Source Folder) is located on another folder/machine you can enter the valid path in the “uPara_ToBeProcessedFolder” variable.
  • If your Backup folder is located on another folder/machine you can enter the valid path in the “uPara_BackupMainFolderPath” variable.
Do you want the code? Click here (From Google).